Finding Lane Lines on the Road
In this project, we use the following tools to identify lane lines on the road:
Color selection
Region of interest selection
Grayscaling
Gaussian smoothing
Canny Edge Detection
Hough Tranform line detection
We develop a pipeline on a series of individual images, and later apply the result to a video stream (really just a series of images). Check out the video clip "raw-lines-example.mp4" (located here) to see what the output should look like after using the helper functions below.
Once the result looks roughly like "raw-lines-example.mp4", we get creative and extrapolate the line segments we've detected to map out the full extent of the lane lines. We can see an example of the result we're going for in the video "P1_example.mp4". Ultimately, we would like to draw just one line for the left side of the lane, and one for the right.
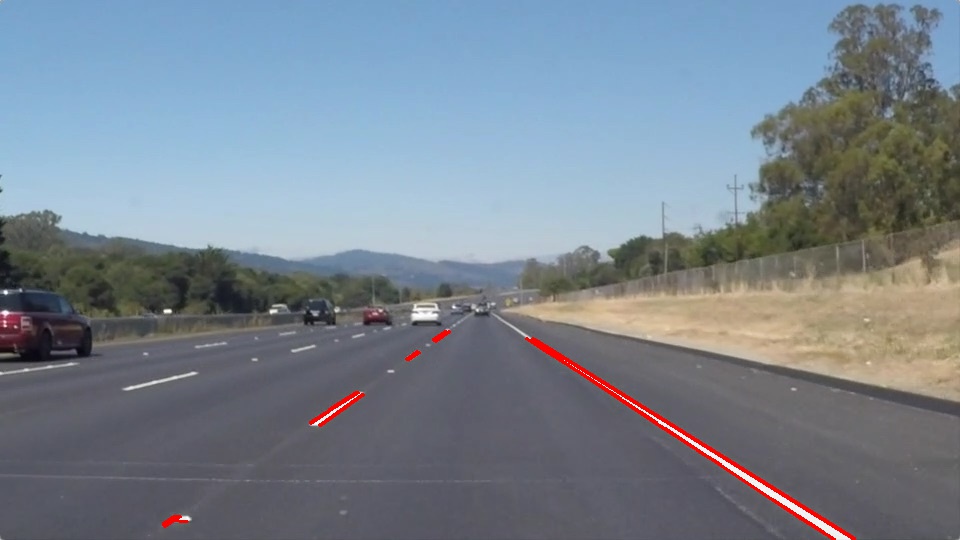
The output should look something like this (above) after detecting line segments using the helper functions below
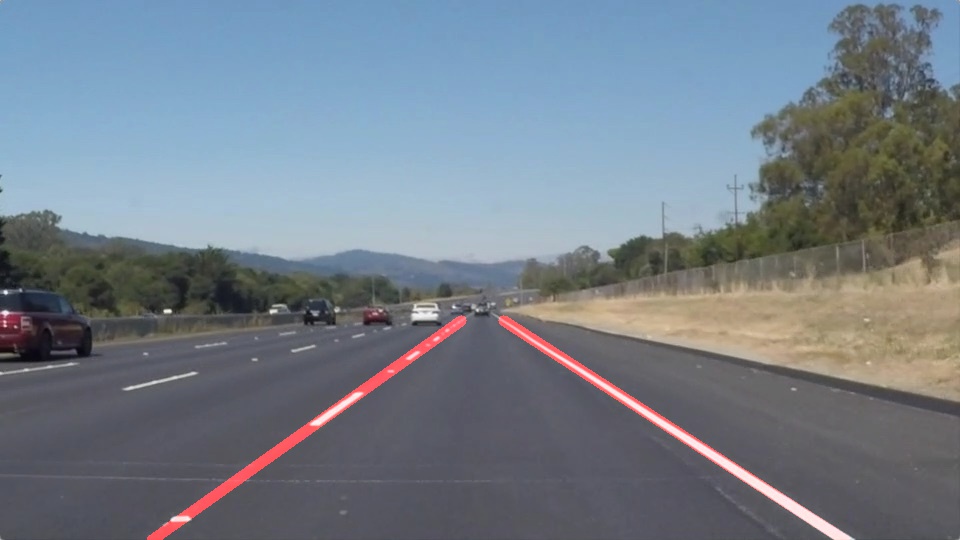
The goal is to extrapolate line segments to get output like this
# Importing some useful packages
import matplotlib.pyplot as plt
import matplotlib.image as mpimg
import numpy as np
import cv2
import math
%matplotlib inline
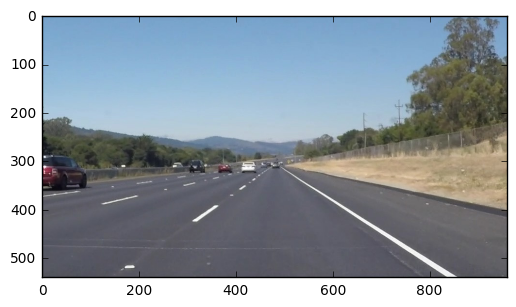
# Reading in an image
image = mpimg.imread('test_images/solidWhiteRight.jpg')

# Printing out some stats and plotting
print('This image is:', type(image), 'with dimesions:', image.shape)
plt.imshow(image)  #call as plt.imshow(gray, cmap='gray') to show a grayscaled image
This image is: <class 'numpy.ndarray'> with dimesions: (540, 960, 3)


<matplotlib.image.AxesImage at 0x10dbac5c0>
# Define the functions that we will need

def grayscale(img):
    """Applies the Grayscale transform
    This will return an image with only one color channel
    but NOTE: to see the returned image as grayscale
    you should call plt.imshow(gray, cmap='gray')"""
    return cv2.cvtColor(img, cv2.COLOR_BGR2GRAY)

def canny(img, low_threshold, high_threshold):
    """Applies the Canny transform"""
    return cv2.Canny(img, low_threshold, high_threshold)

def gaussian_blur(img, kernel_size):
    """Applies a Gaussian Noise kernel"""
    return cv2.GaussianBlur(img, (kernel_size, kernel_size), 0)

def region_of_interest(img, vertices):
    """
    Applies an image mask.

    Only keeps the region of the image defined by the polygon
    formed from `vertices`. The rest of the image is set to black.
    """
    # Defining a blank mask to start with
    mask = np.zeros_like(img)

    # Defining a 3 channel or 1 channel color to fill the mask with depending on the input image
    if len(img.shape) > 2:
        channel_count = img.shape[2]  # i.e. 3 or 4 depending on your image
        ignore_mask_color = (255,) * channel_count
    else:
        ignore_mask_color = 255

    # Filling pixels inside the polygon defined by "vertices" with the fill color
    cv2.fillPoly(mask, vertices, ignore_mask_color)

    # Returning the image only where mask pixels are nonzero
    masked_image = cv2.bitwise_and(img, mask)
    return masked_image

def weighted_img(img, initial_img, α=0.8, β=1., λ=0.):
    """
    `img` is the output of the hough_lines(), An image with lines drawn on it.
    Should be a blank image (all black) with lines drawn on it.

    `initial_img` should be the image before any processing.

    The result image is computed as follows:

    initial_img * α + img * β + λ
    NOTE: initial_img and img must be the same shape!
    """
    return cv2.addWeighted(initial_img, α, img, β, λ)
Test on Images
We first build our pipeline to work on the images in the directory "test_images"
import os
os.listdir("test_images/")
['.DS_Store',
 'solidWhiteCurve.jpg',
 'solidWhiteRight.jpg',
 'solidYellowCurve.jpg',
 'solidYellowCurve2.jpg',
 'solidYellowLeft.jpg',
 'whiteCarLaneSwitch-after.jpg',
 'whiteCarLaneSwitch.jpg']
Test on Videos
You know what's cooler than drawing lanes over images? Drawing lanes over video!
We can test our solution on two provided videos (also found here):
solidWhiteRight.mp4
solidYellowLeft.mp4
# Import everything needed to edit/save/watch video clips
from moviepy.editor import VideoFileClip
from IPython.display import HTML
# Define a function to process the images

def process_image(image):

    # Grayscale the image
    gray = grayscale(image)

    # Define a kernel size and apply Gaussian smoothing
    kernel_size = 5
    blur_gray = gaussian_blur(gray, kernel_size)

    # Define our parameters for Canny and apply
    low_threshold = 50
    high_threshold = 150
    edges = canny(blur_gray, low_threshold, high_threshold)

    # Create a masked edges image
    mask = np.zeros_like(edges)
    ignore_mask_color = 255

    # Define the polygon
    imshape = image.shape
    x_dim = np.shape(image)[1]
    y_dim = np.shape(image)[0]
    vertices = np.array([[(10,y_dim-50),(x_dim-10,y_dim-50),(x_dim/2+40,y_dim/1.65),(x_dim/2-40,y_dim/1.65)]],
                      dtype = np.int32)
    masked_edges = region_of_interest(edges, vertices)

    # Define the Hough transform parameters
    rho = 2
    theta = np.pi/180
    threshold = 15
    min_line_length = 10
    max_line_gap = 20
    line_image = np.copy(image)*0

    # Run Hough on edge detected image
    lines = cv2.HoughLinesP(masked_edges, rho, theta, threshold, np.array([]), min_line_length, max_line_gap)

    #Extrapolate between line breaks
    y_size = image.shape[0]
    x_size = image.shape[1]
    yL_n = 0
    xL_n = 0
    yR_n = 0
    xR_n = 0
    yL_n_1 = 5000
    xL_n_1 = 0
    yR_n_1 = 5000
    xR_n_1 = 0
    cutoff = 500
    for line in lines:
        for x1,y1,x2,y2 in line:
            if x1 < cutoff and x2 < cutoff and y1 > yL_n:
                yL_n = y1
                xL_n = x1
            if x1 < cutoff and x2 < cutoff and y2 > yL_n:
                yL_n = y2
                xL_n = x2
            if x1 < cutoff and x2 < cutoff and y1 < yL_n_1:
                yL_n_1 = y1
                xL_n_1 = x1
            if x1 < cutoff and x2 < cutoff and y2 < yL_n_1:
                yL_n_1 = y2
                xL_n_1 = x2

            if x1 > cutoff and x2 > cutoff and y1 > yR_n:
                yR_n = y1
                xR_n = x1
            if x1 > cutoff and x2 > cutoff and y2 > yR_n:
                yR_n = y2
                xR_n = x2
            if x1 > cutoff and x2 > cutoff and y1 < yR_n_1:
                yR_n_1 = y1
                xR_n_1 = x1
            if x1 > cutoff and x2 > cutoff and y2 < yR_n_1:
                yR_n_1 = y2
                xR_n_1 = x2

    mL = (yL_n - yL_n_1) / (xL_n - xL_n_1)
    mR = (yR_n - yR_n_1) / (xR_n - xR_n_1)

    bL= (yL_n) - (mL*xL_n)
    bR= (yR_n) - (mR*xR_n)

    xLB = (y_size - bL) / mL
    xRB = (y_size - bR) / mR

    cv2.line(line_image,(int(xLB), y_size),(xL_n_1, yL_n_1),(255,0,0),10)
    cv2.line(line_image,(int(xRB), y_size),(xR_n_1, yR_n_1),(255,0,0),10)
    lines_edges = cv2.addWeighted(image, 0.8, line_image, 1, 0)

    # Draw the lines on the edge image
    lines_edges = cv2.addWeighted(image, 0.8, line_image, 1, 0)

    return lines_edges
Let's try the one with the solid white lane on the right first ...
white_output = 'white.mp4'
clip1 = VideoFileClip("solidWhiteRight.mp4")
white_clip = clip1.fl_image(process_image) #NOTE: this function expects color images!
%time white_clip.write_videofile(white_output, audio=False)
[MoviePy] >>>> Building video white.mp4
[MoviePy] Writing video white.mp4


100%|█████████▉| 221/222 [00:02<00:00, 77.43it/s]


[MoviePy] Done.
[MoviePy] >>>> Video ready: white.mp4

CPU times: user 2.61 s, sys: 629 ms, total: 3.24 s
Wall time: 3.27 s
Below is a snapshot from the output video that is produced.
Output from video produced above
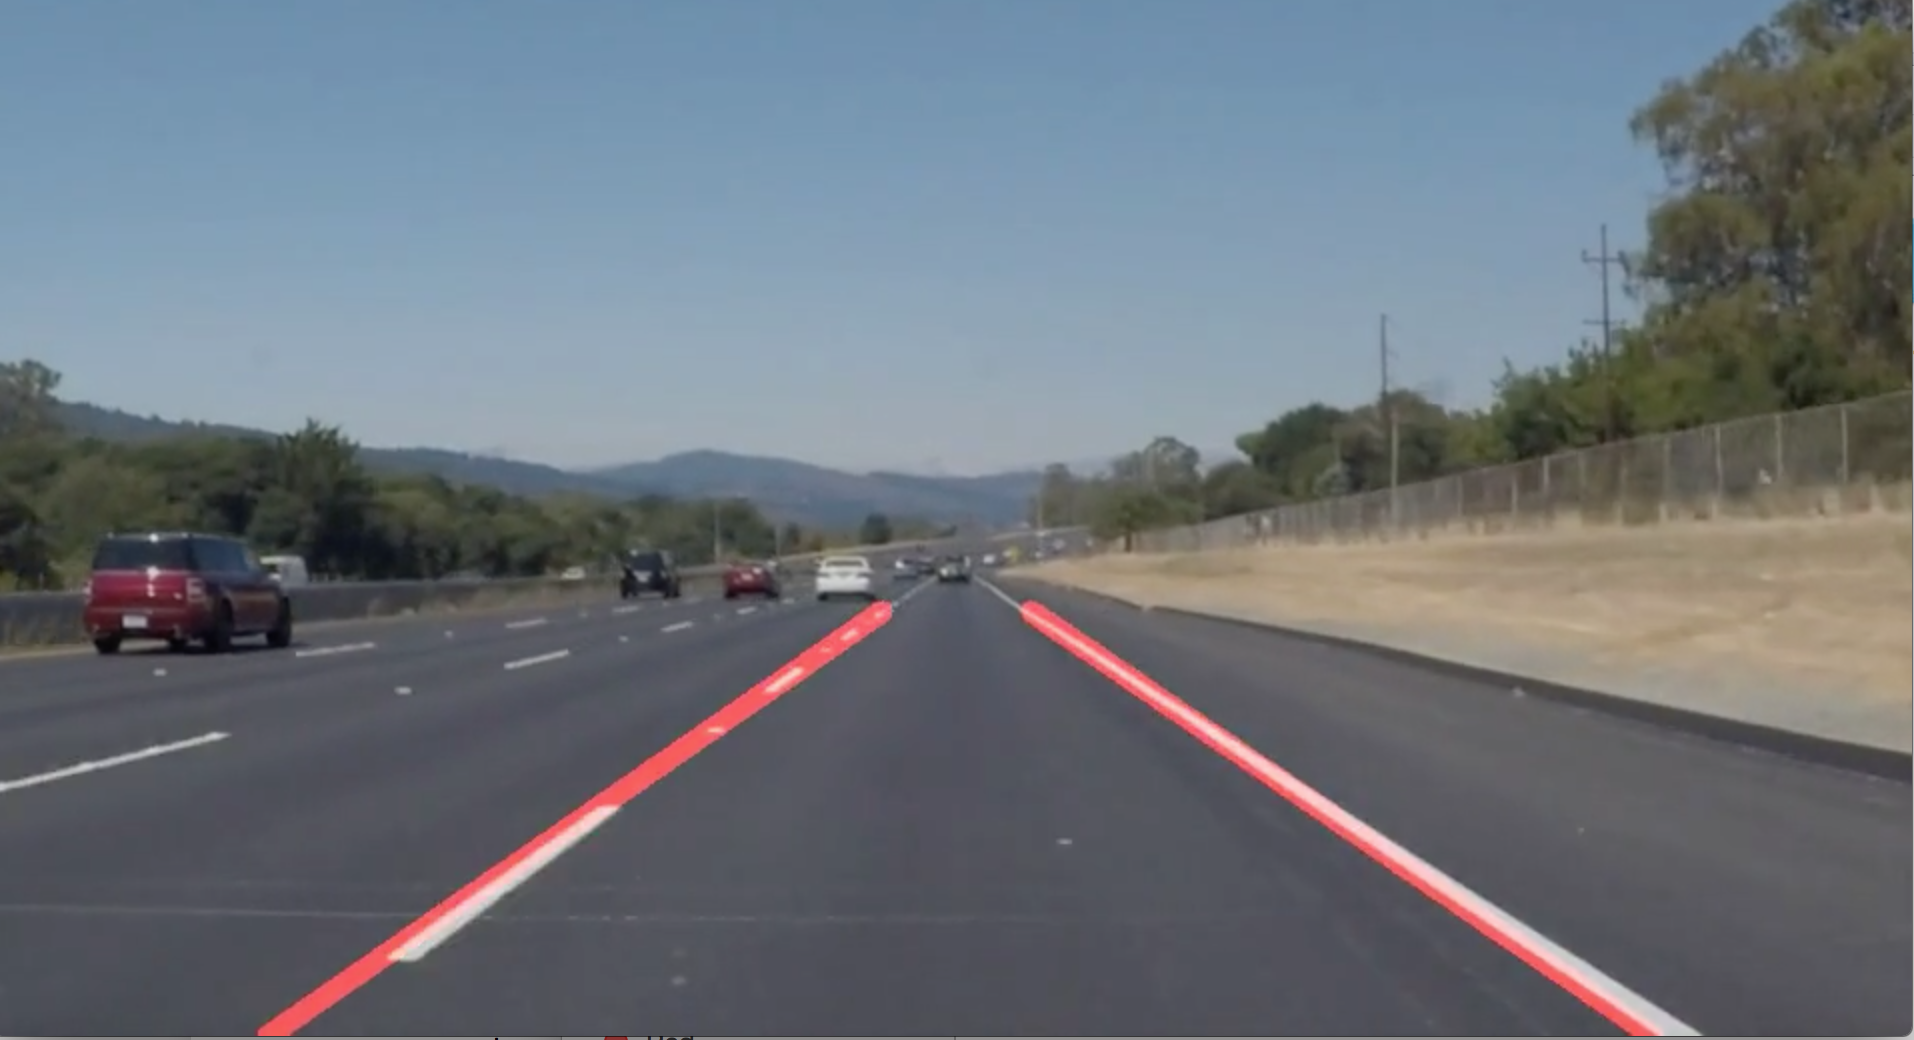
Now for the one with the solid yellow lane on the left. This one's more tricky!
yellow_output = 'yellow.mp4'
clip2 = VideoFileClip('solidYellowLeft.mp4')
yellow_clip = clip2.fl_image(process_image)
%time yellow_clip.write_videofile(yellow_output, audio=False)
[MoviePy] >>>> Building video yellow.mp4
[MoviePy] Writing video yellow.mp4


100%|█████████▉| 681/682 [00:09<00:00, 72.73it/s]


[MoviePy] Done.
[MoviePy] >>>> Video ready: yellow.mp4

CPU times: user 8.39 s, sys: 1.88 s, total: 10.3 s
Wall time: 9.79 s

Output from video produced above
Reflections
Both the output videos produced can be found here called white.mp4 and yellow.mp4.
The current version of the algorithm contains the pipeline to detect lanes on the road and then extrapolates to create line segments.
Although the current version of the algorithm works well with the two videos above, there exist many opportunities to improve uopn this version.
First, the lane lines are differentiated by using the centre of the image. If a particular lane was to fall on the opposite side of the image, the algorithm will not be able to interpret it as a separate lane and thus cause extrapolation issues.
This situation can arise during entrance and exit ramps, lane changes and special construction lanes.
This situation will also arise if there is a relatively sharp turn, which again would break the linearity assumption used in the extrapolation algorithm. In order to overcome this restriction, we can used a more generalized model.
In a real self driving car, we would require real-time processing, which is not the case right now. We would need to bring in real-time processing technologies to increase the practically of this algorithm.